





Introduction
Setting up your Yealink T53W IP phone with Ooma Office is quick and easy. Follow the instructions below to install your phone. You should be up and calling in a few minutes!
NOTE If you do not have an Ooma Office account, please visit office.ooma.com/signup.
Package Contents
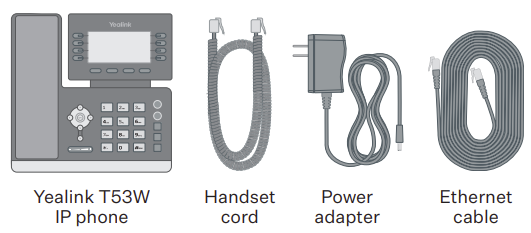
Step 1: Add the Phone to Your Account
If your phone is labeled Ready to Call, you may skip this step and continue to Step 2.
Otherwise, you will need to add your new phone to your Ooma Office account.
Visit office.ooma.com/add-ip-phone and follow the on-screen instructions.
Step 2: Assemble Your Phone
Attach the phone stand to the body. Align the stand  with the slots
  , and slide up until you hear a click. Connect the phone handset to the handset jack
  using the coiled phone cord.
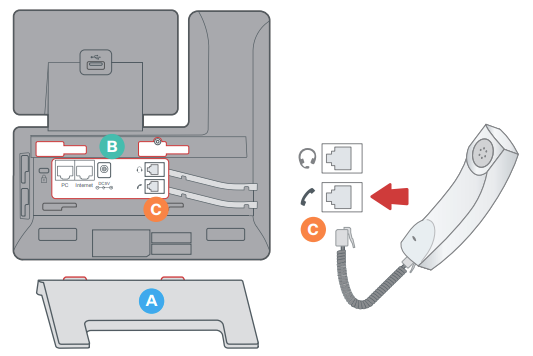
NOTE If you need additional help assembling the phone, please refer to the phone manufacturer’s user manual that is included in your box.
Step 3: Connect Your Phone
Your phone can be connected to the Internet via Wi-Fi or Ethernet.
Wi-Fi
Connect your phone to AC power and let it power up. Once the phone has turned on, you are ready to connect to your Wi-Fi network. The phone should prompt you to connect, but if it doesn’t, navigate to Menu > Ssettings > Basic Settings > Wi-Fi and then select the desired network.
For detailed instructions, please visit support.ooma.com/yealink-wi-fi.
Ethernet
Use the Ethernet cable that came with the phone to connect the INTERNET port on the back of the phone to any available Ethernet port on your router or switch.
Connect the power supply. Skip this step if using Power Over Ethernet (PoE).
Step 4: Get Started
When the phone has powered up and connected to the Internet, the startup process will commence automatically. This process will take several minutes, during which time your new IP phone may restart a few times. This is expected behavior.
Once you see your extension number (e.g. x1001) displayed on the screen along with your name, your phone is ready to use to make and receive calls!